Cheerful Clusters Tutorial and Dishcloth Pattern

Happy Thursday! Welcome to this week’s Let’s Learn a New Crochet Stitch – Kitchen Crochet Edition event. This week I am going to show you the Alternate Double Cluster Stitch in this photo tutorial, plus give you instructions for this pretty Cheerful Clusters dishcloth in sizes 6″ x 6″, 9″ x 9″ and 12″ x 12″. I hope you enjoy this fun and festive dishcloth tutorial and pattern! Happy Crocheting!
This post contains affiliate links. I do receive a commission if you make a purchase through my link(s), which helps support my blog and allows me to bring you more great posts!

Cheerful Clusters Tutorial & Dishcloth Pattern
Add to Ravelry Queue and Favorites
Materials:
- Approximately 42 yds of worsted weight cotton yarn in any 2 colors of your choosing:
- Approximately 14 yds of Color A – I used Lily Sugar ‘n Cream* in Hot Blue
- Approximately 14 yds of Color B – I used Lion Brand Kitchen Cotton in Snap Pea (This yarn has been discontinued and can be substituted with Lily Sugar ‘n Cream*)
- Approximately 14 yds of Color C – I used Lily Sugar ‘n Cream* in Yellow
- Size I Crochet Hook*
- Yarn Needle* for weaving ends
- Scissors*
*affiliate link
Skill Level:
Easy
Abbreviations:
ch(s) – chain(s)
st(s) – stitch(es)
dc – double crochet
dc CL – double crochet cluster
sc – single crochet
t-ch – turning chain
sk – skip
ch sp – chain space
() – indicates stitch counts
Multiple:
Chain any number of sts
Gauge:
3.3 sts & 1.3 rows = 1″
Finished Sizes:
6″ x 6″
9″ x 9″
12″ x 12″
Notes:
- This pattern is written in US terms
- Sizing will vary depending on how tightly or loosely you crochet. Gauge is not necessary for this pattern but if you would like to keep the sizing the same, please check your gauge before starting this project.
- This pattern is written for a 6″ x 6″ dishcloth with stitch counts for 9″ x 9″ and 12″ x 12″ written in parenthesis. The 9″ dishcloth stitch counts will be written in italics and the 12″ dishcloth stitch counts will be written in bold.
- Chain spaces are included in the stitch count at the end of the row.
Special Stitches:
3-double crochet cluster (3-dc CL):
- Yarn over
- Insert hook into designated stitch
- Yarn over, pull up a loop (3 loops on hook)
- Yarn over, pull through 2 loops (2 loops on hook)
- Yarn over, insert hook into same stitch
- Yarn over, pull up a loop (4 loops on hook)
- Yarn over, pull through 2 loops (3 loops on hook)
- Yarn over, insert hook into same stitch
- Yarn over, pull up a loop (5 loops on hook)
- Yarn over, pull through 2 loops (4 loops on hook)
- Yarn over, pull through all 4 loops. Cluster made.
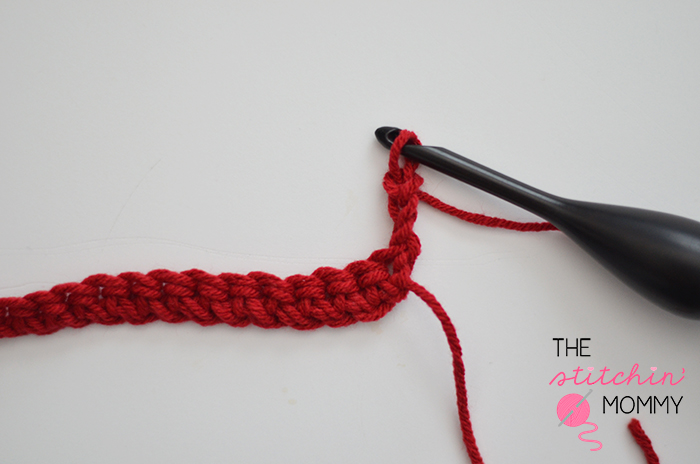
Photo Tutorial:
With Color A, Ch 20

Row 1: Begin working your first 3-dc CL by yarning over and inserting the hook into the 4th ch from hook. Yarn over and pull up a loop.

Row 1 cont’d: Yarn over and pull through 2 loops. There should be 2 loops on your hook.

Row 1 cont’d: Yarn over, insert hook into the same st, yarn over and pull up a loop.

Row 1 cont’d: Yarn over, pull through 2 loops. There should be 3 loops on your hook.
Row 1 cont’d: Yarn over, insert hook into same st, yarn over and pull up a loop.

Row 1 cont’d: Yarn over, pull through 2 loops. There should be 4 loops remaining on your hook.
Row 1 cont’d: Yarn over, pull through all 4 loops on your hook. The first 3-dc CL has been made.

Row 1 cont’d: *Ch 1

Row 1 cont’d: sk the next st, work a 3-dc CL in the next st**
Row 1 cont’d: Repeat from * to ** across, changing colors in the last yarn over of the last st, turn.

Row 2: Ch 3

Row 2 cont’d: Sk the first 3-dc CL, work a 3-dc CL in the next ch sp

Row 2 cont’d: *Ch 1

Row 2 cont’d: work a 3-dc CL in the next ch sp** Repeat from * to ** across, changing colors in the last yarn over of the last st, turn.
Row 3: Repeat Row 2, change to Color A
Row 4: Repeat Row 2, change to Color B
Row 5: Repeat Row 2, change to Color C
Row 6: Repeat Row 2, change to Color A
Row 7: Repeat Row 2, change to Color B
Row 8: Repeat Row 2, fasten off.
This will give you approximately an 6″ x 6″ square. You can add a simple sc border around the square to finish it off.

Written Instructions:
With Color A,
Ch 20 (30, 40)
Row 1: Work a 3-dc CL into the 4th ch from hook (ch-3 counts as a dc), *ch 1, sk next st, work a 3-dc CL into the next st** Repeat from * to ** across, change to Color B on last yarn over, turn. (18, 28, 38)
Row 2: Ch 3, sk first 3-dc CL, work a 3-dc CL into the next ch sp, *ch 1, sk next 3-dc CL, work a 3-dc CL into the next ch sp** Repeat from * to ** across, working the last 3-dc CL under the ch-3. Change to Color C in the last yarn over, turn. (18, 28, 38)
Row 3: Repeat Row 2, change to Color A
Row 4: Repeat Row 2, change to Color B
Row 5: Repeat Row 2, change to Color C
Row 6: Repeat Row 2, change to Color A
Row 7: Repeat Row 2, change to Color B
Row 8: Repeat Row 2, (fasten off for 6″ dishcloth) Change to Color C for other sizes.
Row 9: Repeat Row 2, change to Color A
Row 10: Repeat Row 2, change to Color B
Row 11: Repeat Row 2, change to Color C
Row 12: Repeat Row 2, (fasten off for 9″ dishcloth) Change to Color A for 12″ dishcloth.
Row 13: Repeat Row 2, change to Color B
Row 14: Repeat Row 2, change to Color C
Row 15: Repeat Row 2, change to Color A
Row 16: Repeat Row 2, Fasten off, weave all ends.
Finish:
You can add a simple border by joining your yarn with a sl st in one of the stitches, sc evenly around placing 3 sc sts in each corner, join in beginning sc with an invisible join. Fasten off, weave ends.
If you have any questions, please feel free to contact me!

Terms of Use:
Free patterns found on this site can be used to make finished items for the following purposes:
- For personal use
- As gifts for friends/family
- For charity donations
- For sale online
- For sale at craft fairs, outdoor markets, etc.
When using the free patterns found on this site, please be aware of the following:
- You are allowed sell finished items from the patterns found here. However, you may NOT, under any circumstances, use the photos found on this site for selling your items. If you are going to sell online, you should make your own items and photograph them to represent your own work.
- You may NOT copy and paste the pattern onto your own blog, Facebook, or anywhere else. If you would like to share a pattern, simply share the link to the page instead. You are welcome to copy and paste a pattern into a document for printing or saving for personal use only.
- You may NOT use the free patterns found on this site as teaching material and/or for online classes without expressed written consent from the designer/owner of this page.
- You may NOT use the free patterns found on this site to create video tutorials on YouTube or any other video platform, site, or blog.
- You may NOT post a translation of the patterns found on this site anywhere without expressed written consent from the designer/owner of this page.
- You may NOT PDF patterns found on this site, altered or in its original form, for intent to distribute to others or post on illegal pattern sharing sites. The revenue earned by ad traffic to this site is what allows for free patterns to be written and published. Without people visiting this site to view the patterns, there will be no traffic which means, no more free patterns.
- You may NOT copy any of the free patterns on this site, in part or as a whole, and claim them as your own pattern.
- You may NOT resell the free patterns found on this site, altered or in its original form.
If you have any questions regarding the terms of use of this page, please contact the designer/site owner.


